For a safe secure mounted vehicle see Jtis's jacking/lifting procedures! Safety should always be your first choice! Never work under an unsecured car jack either mechanical or hydraulic, always secure the vehicle with vehicle supports, wheel wedges, hand brake!
FAILURE TO FOLLOW SAFETY INSTRUCTIONS MAY RESULT IN PERSONAL INJURY OR EVEN WORSE!
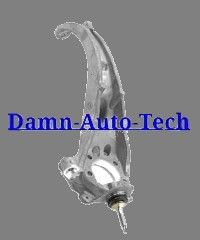
Changing the front lower arm ball-joint
Use Jtis information of how to dismantle the front brake, wheel bearing/hub, knuckle system. Ball joints, shock absorber bushings, can be purchased separately. Tip on knuckle removal: Hold the hexagon firmly in its position, not to do so could tare boot (water ingress, corrosion, extreme ware will occur)
With an axle assembly like this, an easy lower ball-joint, shock bushing, stabilizer link
check can be performed, while, wheel, brake-disc, calliper, knuckle weight are now pressing the lower ball-joint
into its seat.
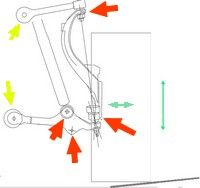
Procedure: Jack up preferred side, 2-3 cm wheel space, placing a lever underneath the inner or outer side of the wheel,
lifting (slightly) and relaxing, then more/less forceful ups and downs, especially when testing shock-absorber bushings,
stabilizer links, see/feel if there is recognizable play either within the lower/upper ball joint or
shock-absorber bushing, stabilizer link ball joint.
Stabilizer mounts are check separately (use lever), mounts should lead
stabilizer firmly, no recognizable play.
Places of malaise on this front axle were the stabilizer link rods, lower ball-joints,
shock-absorber bushes (red).
Check steering ball-joints,
place one hand on the outer left the other on outer right side of the tire tread, waggle the wheel, pushing left
pulling right, back and forth in short intermediates (small green arrow), their should be no recognizable play.
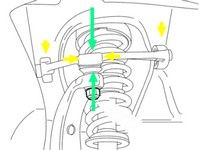
Upper arm, use both hands to apply force, pull up and down, push left to right, back and forth, feel if their is recognizable play within the upper arm mountings and ball joint (yellow, green), further check that all mounts are not worn and that their vulcanization is still intact. Torque all axle bolts!
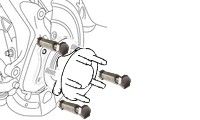
Changing the ball joint means removing the wheel hub/bearing, here, this bearing case was so tightly corrugated that I had to use extreme measures to get it out, first, by carefully heating up the knuckle with hot air (<60min.) (aluminium expanse more than the iron casing pro degree Celsius), made myself a special tool with 3 or 4 long-nuts and screws, shortened them to my needs, were evenly placed and tightened on a solid pressure resisting area, then with carefully placed aluminium hammer pounding and occasionally re-adjusting special tools, it budged.
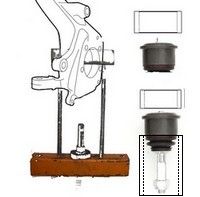
Having cut the ball joint extension off, rigged my custom made press with an upper press ring, I was able to press it out. Upper press ring (out) must fit near to exact the outer diameter/height of the ball-point casing. Press ring (in) fits to ball-joint outer area rim, long press piping fits to approximately the joint press fitting, its length a bit longer than the extension itself.
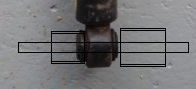
Changing front or rear shock absorbing bushings:
Mark the position of the shock absorber, left or right side and the position
which points to the vehicle front. Bushes are easy to press out,
first measure its positioning, one side is a bit protruded, find some kind fitting, steel pipe end pieces
or even sockets will do well, length of M10 rode, thick washers, nuts. A worn-out bushing can be pushed out through
pressure on its middle piece, though, not the new one, here we have to put pressure on the outer bushing case
without damaging the rubber boot. After completion, if necessary, remove pealing paint from the shock-absorber's spring and
conserve again.
General Service Information
General Service InformationRear axle
Rear sub-frameFront axle
Lower ball-point joint, Shock absorber bushes, Stabilizer bar links + mountsBrake disc and pads
Engine
Intake Manifold / Ignition Coils / Spark-plugs/ engine-block ventilation (elbow)Injectors
Starter system
Valve clearance, timimg-chain, tensioner and glides:
With valve clearance in its tolerance,
there was no need to take the camshafts down, so tensioners and co. have to wait, the good thing is the
tensioner pumps up in 3-4 min. the rattle noise disappears.
Cruise control malfunction, emergency mode
Automatic Transmission 5R55N
Info, tips, Fail Safe ModeStall Speed Test procedure and diagnoses
Valve Body, known issues
Valve Body, Solenoid test procedures
Line Pressure Test
Self made press for pressing down clutch drum springs, checking clutch tolerance without a dial gauge
Chassis
Air ConditioningMiscellaneous repairs
Wind-shield-wiper mechanism:
Time on the lot took its toll, wind-shield-wiper shafts had seized,
uninstalled the mechanism, freed the seized shafts through the use of a good rust loosener, heat, force.
Water in Spark-plug wells 3-2 cylinder:
After days of heavy rain the engine began to misfire with
accounted trouble codes, spark-plug wells were wet, an ionized rusty red path on the ceramic insulator had developed which shorted the
HV ignition spark.
Radio:
Connected the radio controls to the multifunction steering wheel using
an analog digital converter.