

For a safe secure mounted vehicle see Jtis's jacking/lifting procedures! Safety should always be your first choice!
FAILURE TO FOLLOW SAFETY INSTRUCTIONS MAY RESULT IN PERSONAL INJURY.
Changing mount bushings on an uninstalled rear sub-frame, without specialized Jaguar tools, nor a hydraulic press!
After citing a hole and one hole after the other (no welding allowed!), my first thought, hell came to earth, and now, I'd have to replace this part, too. First, finding one in a good condition with hopefully unworn mounts or even a minimally corroded frame, would be a hard task. On ebay I found one, with worn mounts (loosening vulcanization, crackly). I ordered all four mounts, brought the sub-frame to the nearest car shop to have the mounts replaced, though the shop wasn't a Jag dealer and he probably didn't have the special tools needed for the replacement, but he said he had a press that would do the job, after an hour of effort he rang me up and told me that the mounts didn't budge a bit and gave up. So, I had to do the job on my own and here is how I done it.
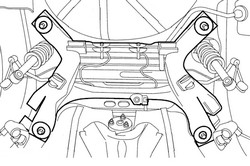
Pump up the rear of the Jaguar, secure the vehicle and remove rear sub-frame, do all of this in accordance to Jtis specifications. Mark x,y axes (sub-frame's alignment points (Jtis)), this will then let you position the sub-frame accurately on its old location, however, this would not make an alignment check unnecessary, but It could save some time whilst adjusting. I did this job on my drive way, I also removed the shock-absorbers (worn-out bushings), though, I didn't remove the exhaust system (no torch at hand), hanged it out, set it deep enough, put vehicle stands underneath, (Marked) lowered the transmission cross-member (small jack underneath). With two men, one left one right, we were able to remove the frame by moving it to the left side with a turn clockwise. Use new bolts.
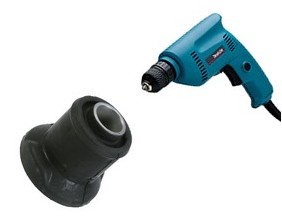
1. Position the frame well and secure, mark the positions (angle) of each mount! Drill a few holes that fit the width of the jigsaw blade.
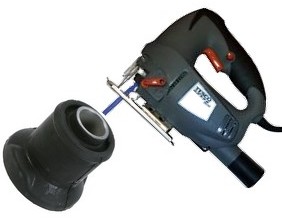
2. Use a long blade that passes through the entire length of the mount (hold firmly!), have replacement blades at hand.
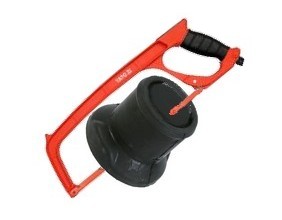
Hookup the hacksaw blade inside the mount, saw through the outer casing and don't saw into the sub-frame (spacing about 1-2mm), after cutting through the outer casing, use a relative large hammer, and a chisel to bend one side inward, this will release the press pressure holding the mount.
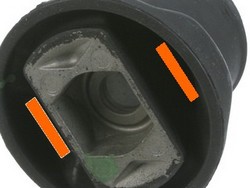
Only apply pressure here! (orange)
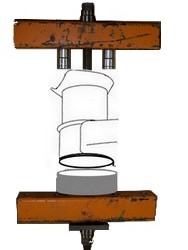
Home brew press
Use a fine threaded rod M12x1-M16x1 (1.25) with a long nut, with a fine thread lesser strength will be needed, drill a centre hole in a thick peace of square rod or similar (shoulder support) that will withstands a few tons or more of force. Now, place two sockets (~15mm) positioned at the pressure points, centre the shoulder support, mark the socket positions, then remove shoulder piece, fasten the positioned sockets with a few rounds of masking tape. For the bottom part, I used a 3" pipe fitting. Set the new mount to the recently marked position, lubricate the mount only with turpentine, than it evaporates (fast), keep mount wet whilst pressing.
Is there another alternative of how to get these mounts out, yes there is, by carbonizing the rubber, though, which is a
polluting, sticking way to do it and it is not recommended in tight inhabited areas such as the neighbour hood.
General Service Information
General Service InformationRear axle
Rear sub-frameFront axle
Lower ball-point joint, Shock absorber bushes, Stabilizer bar links + mountsBrake disc and pads
Engine
Intake Manifold / Ignition Coils / Spark-plugs/ engine-block ventilation (elbow)Injectors
Starter system
Valve clearance, timing-chain, tensioner and glides:
With valve clearance in its tolerance,
there was no need to take the camshafts down, so tensioners and co. have to wait, the good thing is the
tensioner pumps up in 3-4 min. the rattle noise disappears.
Cruise control malfunction, emergency mode
Automatic Transmission 5R55N
Info, tips, Fail Safe ModeStall Speed Test procedure and diagnoses
Valve Body, known issues
Valve Body, Solenoid test procedures
Line Pressure Test
Self made press for pressing down clutch drum springs, checking clutch tolerance without a dial gauge
Chassis
Air ConditioningMiscellaneous repairs
Wind-shield-wiper mechanism:
Time on the lot took its toll, wind-shield-wiper shafts had seized,
uninstalled the mechanism, freed the seized shafts through the use of a good rust loosener, heat, force.
Water in Spark-plug wells 3-2 cylinder:
After days of heavy rain the engine began to misfire with
accounted trouble codes, spark-plug wells were wet, an ionized rusty red path on the ceramic insulator had developed which shorted the
HV ignition spark.
Radio:
Connected the radio controls to the multi-functional steering wheel using
an analog digital converter.